Total Pageviews

Showing posts with label tonic studios. Show all posts

Monday, January 28, 2013

Do I feel a Little Love in the Air?

Well the month of January has definitely flown by. I can't believe in a few short days it will be February. February brings Valentine's Day! A day where you take a moment to cherish all of the relationships and friendships in your life.
 
I had fallen in love with the Carta Bella's Devoted line. Its all of your traditional colors for Valentine's with a twist of two of my favorite colors: Grey and Aqua. This line is so cute and I am sure a few other projects will also be done with it yet.
 
I did a very simple layout with a pic of my brother and sister in law with their oldest child. I think this is such a great picture and I didn't want the layout to take that away. This picture along with some of the other pictures in my previous post were all taken by their super talented friend Jenny.
 
I used my mini heart punch and my simplicity doily border punch from Tonic Studio to make the embellishment that goes across the page. I punched the hearts out at regular intervals and then I made two border strips with the doily punch. I then backed the heart strip with a coodinating pattern paper and adhered it all together in one layered strip. I then used the actual punched out hearts on the corner of the layout.
 
Here are some close ups of the layout so you can see the details of the punches.


So what Valentine Projects do you have up your sleeve this year? I would love to hear about them. I have a few cards and special projects to work on myself yet!
 
Happy Creating!

Friday, December 21, 2012

Some More Christmas Cheer!

I am back today with more card ideas! We just got ourselves dug out from the storm. We ended up with 14 plus inches of snow! It makes a for a beautiful winter wonderland. I hope you enjoy the card and tag ideas!

These were done with Echo Park's Seasons Greeting and October Afternoon's Merry Christmas lines and with Tonic Studios punches. I used stickles to color in the the snowflakes to give them some more sparkle. The tags were made all with scraps!

 
Here are all of the cards I made with Doodlebug's North Pole pattern papers and embellishments. I also used Tonic punches on some of these cards as well.


Happy Holidays from our family to yours!
 
Happy Creating!

Thursday, December 20, 2012

Holiday Projects Galore!

I love this time of year, I just wish there were more hours in a day to get all of the projects done that I want to! As many of you may know I make all of my holiday cards to send out and no two are identical! I am not one who likes to do a production line or mass produce if I don't have too! I love just getting everything out and seeing how inspiration hits! So here are some of the cards some will see coming their way this year! I hope it helps inspire you to create something special yet for this year or for next year!

Here are some items I made with Doodlebug Design's North Pole Line. I love the traditional colors of this line. I of course used some of my Tonic punches as well on the projects. I used the Simplicity Victorian Border punch and the Scalloped Arc Border along with the medium Holiday Tree and Multi Level Snowman punch.

                                                           
                                                               Here are there close ups!


I will be back with some more projects tomorrow! Stay warm (here in WI we are in the middle of a blizzard, 14 inches and counting!) Happy Creating!

Thursday, December 13, 2012

Vintage Christmas Fun

I can't believe that Christmas is just around the corner. This can be the craziest time of the year with  lots to do, place to go, people to see, parties to have. Let alone taking time to do some fun scrappy things this time of year.

I snuck some time for myself since I wanted to share some quick, fun and easy things that can help spruce up either your home, office, or table.

I have been hoarding this October Afternoon Very Merry paper for quite some time. I love the color combination on these papers. My inspiration to use this paper actually came from buying the cute little wire basket from Hobby Lobby. Isn't it amazing what can spark your inspiration!

So I did some traditional items for the holidays like my paper garland, and card and something a little less traditional- pinwheels! Yes, I said Pinwheels... they aren't just for summer! Come take a look!

 
Pinwheel How To:

For the larger Pinwheels I cut my paper to 8x8. I then measured from corner to corner. I drew a pencil line from the corner down to 4.5 inches and then from the bottom corner up to 7 inches. (Smaller is 6x6 and I went from the corner down to 3 and from the bottom corner up to the 5.5 inches.) I then cut on the lines. Next I punched the holes. Please see diagram.  I then took a border punch and did the edges. Next take the brad and gather the corners and then put the brad through the center and close it. The below diagram will help you place the holes.
 

The pinwheels are fun to use to dress up the candy containers for little visitors, or to decorate a table. They are also fun to use on a present as a bow to spiff up a special present for someone. You could also attach them to your garland for a fun window dressing. The options are endless and versatile for any occasion!


Garland How To:
For the garland again you will want double sided pattern paper, or cardstock since the color shows through. For this I took my paper and cut 2.5x 12 inch wide strips. I then punched down both sides of the strips. I then cut them in half since I wanted a smaller looped garland. Then just take end to end and staple take the next strip and link it and staple…
 Incredibly simple but oh so cute!!  There are so many fun variations you can do with this. You could alternate with cardstock or Kraft paper, you can make bigger loops to use on a mantle or for above a window or for a tree… you could stamp holiday sayings on them or you could take a punch and cut a pattern along it… I am sure this isn’t the last garland you will see. I just can’t believe it took me this long to think to use my punches on it.


Last but not least here is the close up of the simple card I made with my punches and some left over paper scraps.


I hope you enjoyed the vintage holiday projects and came away with a few ways to dress up a special present for someone, to add some unexpectant charm to a table or display, or helped inspire a holiday card!
 
Happy Holidays!!! And Happy Creating!


Saturday, October 20, 2012

OWH Card Sketch Challenge- Halloween Style

Welcome everyone! Today's challenge was to make a card based on Missy's card for the OWH Card Sketch Challenge:

 
Here is the sketch to inspire all!
 
 
After seeing the card, I had a ton of ideas floating around in my head.  Its a very simple design which can easily be adapted for any occassion.
 
Since Halloween is just around the corner and I had just gotten some fun new Doodlebug supplies,I decided to do a Halloween card.
 
The hardest part to making this card was to decide what fun pattern papers to choose and what to use as my embellishment.

Here is the list of supplies you will need to make my card:

1- 5x7- Kraft Card
1- 4.75x6.75 piece of white cardstock
4-Coordinating pattern papers
4- Fun embellishments that relate to your theme
1-Saying/Expression
Some Bakers twine
Adhesive, Paper Trimmer, a Paper Piercer, and a border or strip punch


How To Instructions:

First I started by cutting my white piece of cardstock. I then found some coordinating papers to use as my strips along the card. I used a 6x6 paper pad so I then cut 4- 1.5 inch strips of pattern papers.

I then took my  Tonic Simplicity Border Punch – Scalloped Arc Border 


 Punch along both sides of your strips to create this design for the card. I then lined them up on the white piece of cardstock and trimmed off any excess paper that overhung the edges. This made for a precise edge with out any guessing or measuring on how long the strip needed to be exactly.

After the strips were in place I then placed my spider embellishments!

 I then used a paper piercer to pierce a hole in the paper right above each spider this way I could thread the twine through the hole and adhere it to the back of the white with some adhesive. I then traveled the twine to the top of the card and folded it over the edge and then tucked that end down with some adhesive as well on the back. After everything was in place I took my sticker Happy Halloween and placed that down and then adhered the white cardstock to the kraft base card.


That is all that is to it, Very Easy which is nice for cards. I  look forward to making other cards in different themes based on the sketch, I can easily see a nice winter one with snowflakes as the embellishment, or a baby card with stars as the embellishment.... so many choices!

 I hope this has inspired you to make a card or two!

Happy Creating!!

Sunday, October 7, 2012

Halloween Cards

I had some fun playing with my Tonic punches and with some of my long lost stash of halloween scrappy goodies! I love digging though my seasonal stash of things and forgetting what I have and making things work together! Don't get me wrong I have new halloween goodies, but I felt compelled to use some of my older stuff first!

For these cards I used for pattern papers Authentique Glowing and embellishments are Authentique Glowing and Making Memories. As for punches I used the Scalloped Arc Border simplicity punch and the Tag and ticket Duo punch. I had a lot of fun playing with all the pattern papers and the fun little diecuts from the collection. I love that this has a vintage feel to it as well.

Here is the whole collection of them. 


Here is a close up of two tiny cards I did. 


This is one of my favorites since it has all the fun pattern papers!!


Another fun one that I used just the scalloped border punch.


This one I used the big die cut for the saying and I used the border punch just on the tips of the strips. 
 
I hope this gave you some ideas on what to do with some of your stash! I hope to have some more halloween projects yet this month so stay tuned!
 
Happy Haunting!!

Tuesday, September 18, 2012

A Chill is in the Air!

I would so be in heaven if I could find a place that was always wrapped in the beautiful colors of fall and the awesome crisp temperatures. Anyone know where this place exists??

Can you tell, I am so loving this weather? The nice cool crisp air, no more of the 90+ degree days.. I think we ended up with like 39 of those this summer.. Ucky-Not for me!

Fall is my favorite time of the year and I was so excited to see what Simple Stories Harvest Lane collection looked like. Needless to say I was not disappointed! Its a very cute collection with all the fun ,rich, earthy colors of fall. I made a layout and a card with the collection and I can't wait to make more with it since I have tons of fall pictures due to our yearly trips to Door County.

On the layout I used the following Tonic Punches:

Tonic Tools used: Edger Punch 3, Border Punch: Pumpkin, Maple Leaf and Fall, Simplicity Border Punch- Scalloped Diamond Punch, Duo Ticket and Tag punch.

Here is a close up of the heart embellishment.


The heart embellishment is a 4x4 piece of cardstock covered with layered border punch strips. I then used one of the 4x4 elements on the pattern piece of paper I then used my scissors to cut the heart out and then layered it on top with pop dots so you can see the fun pattern paper through the cut out.
Here is a fun simple card I made as well with the collection. This is geat for a new homeowner or someone who may have recently moved into their own place.


Here are the two projects together.


Well I hope my projects inspired you to make a fall project! Happy Creating!

Tuesday, August 14, 2012

Chevrons and Simple.. What more can I say

I apologize that I haven't posted in awhile. Life has gotten a little crazy for us lately. Rest assured it is all crazy good! With all the craziness the scrapbooking took a brief hiatus. I am back though and right now I have been loving anything that has a chevron. Not sure why... maybe its the bold colors with the high contrast of usually white in the pattern. I just like the clean look of the design.

I have been looking at my Tonic punches wondering what I can do to  use one of them a little differently. I then found that the Simplicity Border Punch in the Scalloped Diamond pattern resembles a chevron design. I couldn't wait to play and find just the right width of paper strip to use. I found that using a 1.5 in wide paper and however long works the best. So I cut a bunch of strips and began punching away!

This layout is way simpler then I am used to doing, but I love how it turned out. Very crisp and graphic. Plus who doesn't love a picture of a cute kid with his daddy! This was a cute picture of my brother and his little guy. I hope you like what I came up with and I challenge you to use a punch in a different way and see what you can come up with.

Here is my layout:


Don't you just love the chevron look of the punches! I hope you enjoyed and Happy Creating!

Monday, July 2, 2012

Day 3 of Tonic Punches Summer CHA Reveal!

This is it!!!

These are the last 3 punches of the bunch. I hope you have enjoyed all of the projects we have come up with to showcase the punches. Remember there are giveaways as well. Remember to leave a comment on this post and on yesterdays and Saturday's if you haven't already.. also make your chances are even better & go check out the other two design team members blogs, Missy's blog  & Jackie's Blog and comment there as well! Please  note, The giveaway is only open to those in the US.

I will pick a winner on July 9th from each day to win that set of punches. If you have other crafty friends please pass on the word!


Today we are featuring the Scalloped Diamond Border, Daisy Border and the Vine Strip.

On this layout I used the Scalloped Diamond Border. As you can see the punches are easy to use so I was able to make lots of borders in all sorts of colors to decorate my circles that I used as accents. This close up shows you the fun pattern the border makes.


Don't you just love the colors of this Basic Grey paper?? It works so well with the pictures of the niece and nephew playing in their car.


Here is how it all came together.


Next I used the Daisy Border and the Vine Strip together for a wedding layout. I want to show you a close up these two punches in action. I have two daisy borders back to back with the vine strip in the middle. 


Here is how this layout turned out. I actually later found some really cool white and and some small pink pearls that I added to embellish the daisy centers.


I hope you were able to get a lot of ideas on how to use these punches the last 3 days and hopefully you have commented on all 3 days posts in order to have a chance to win the set featured that day!

Thanks for following along with us and Happy Creating!


Sunday, July 1, 2012

Day 2 of Tonic Summer CHA Release Reveal

I hope you enjoyed yesterday's projects and that you left a comment on yesterday's post so that you  have a chance to win the 3 punches showcased yesterday. We are doing the same thing today and tomorrow as well. We are featuring another 6 punches and you have a chance to win by leaving a comment on the next two days. I will pick the winners on July 9th, so please make sure and check back to see if you are winner. (Please note the contest is limited to those in the US.)


You can check out the other 2 design team members blogs as well for another chance to win! Here are the links to their blogs Missy's can be seen here at: http://tonicgallery.wordpress.com/
and Jackie's can be seen  here at: http://shortwizard.blogspot.com/


Today, we are showcasing the Victorian Border Punch, the Doily border and the Floral Border. In the layout below I used the Doily and the Victorian Border.


I even used the border punch on the rosettes.


When making the rosettes I used hot glue and placed them on a circle to give them sturdiness.

I then used the tonic petal pairs to embellish the middle of them.

The other layout showcases the Floral border and the Victorian Border. I also used the Multi Detail Butterfly punch as well.


I hope you enjoyed today's reveal and that you go back and check out yesterday's post for a chance to win that set of punches and come back and see us tomorrow for our final reveal.

Don't forget to leave a comment for a chance to win these punches!!!

Happy Creating!!!


Saturday, June 30, 2012

Tonic Studios CHA Sneak Peeks!

Today is the first day of three sneak peeks for Tonic Studio's Summer CHA release. Each day I will feature 3 of the punches. You will not only get to see what they can do but you will also have a chance to win some as well! So what do you need to do to win? Leave a comment on what punch or layout is your favorite, I will pick a random winner from those that have posted. (The contest is limited to the US only). I would love some new followers as well, so if you enjoy layouts, cards, home decor make sure and follow me as well!

To better your odds of winning make sure and check out the other blogs of the design team as well. I will place the links to their blog at the end. Enjoy checking out the new product!

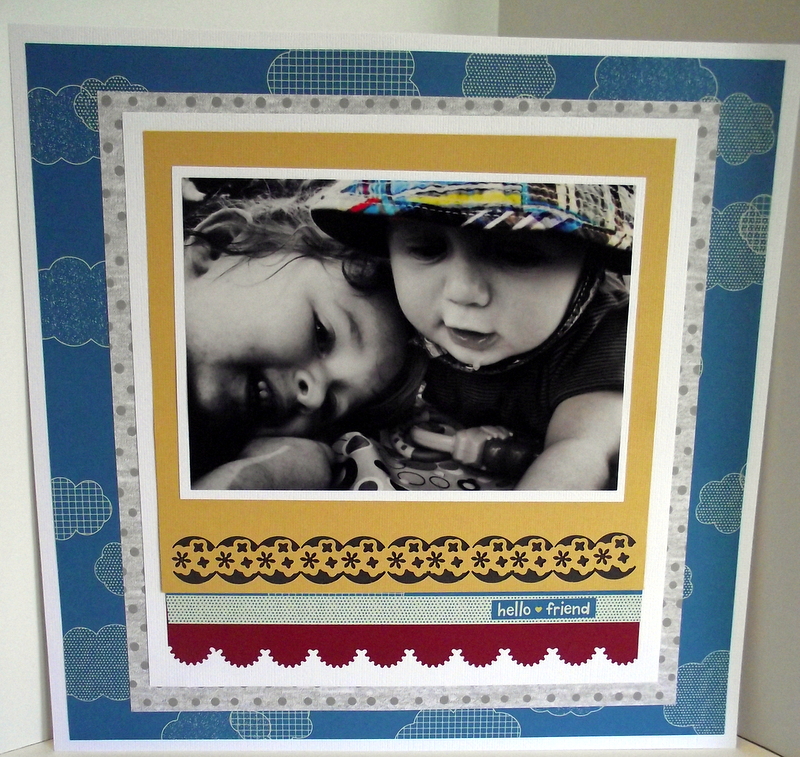
First is the Scalloped Arc Border #761
Here is the layout that I made using the scalloped arc border punch. I had a lot of fun using this to not only border the journaling card area but also the word strip. The border punches are really easy to use they not only cut through pattern papers with no issue but also cardstock. They are not hard on the hands either since they have a gear system in them that does the work. So you can make as many borders as you want and still be able to use your hand!

The pattern papers I used for this layout is Echo Park's Woof Line. This all worked very well in order to do a fun layout about our pup, Otis.

Next is the Floral Strip # 769 ( I accidentally used the wrong one in my day one sneak peeks so on the other gals projects you will see a different floral punch which  I will show you tomorrow I guess I got to excited about this one! )

 
I made this really simple layout and I used not only the Floral Strip but also the Scalloped Arc. I used the floral strip to inset the mat of the picture. I used the other punch to add a pop of color to fram the word strip.


The pattern papers used on this layout are from American Crafts, Amy Tangerine.

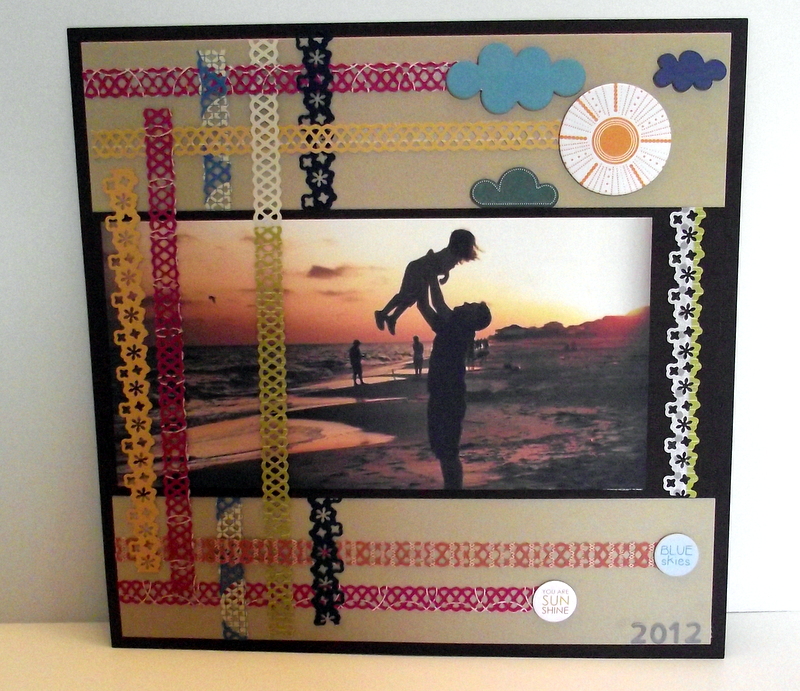
and last but not least is the Doily Strip # 766

 
Here is the layout I made with the Doily Strip and Floral Strip. I wanted to have fun and see how the punches transform all my fun pattern papers and bright cardstocks. It is amazing how cool some of the strips came out. It was fun weaving them in and out around the page as well to see how it changes the look and flow of the page.

The pattern papers on this layout is again American Crafts Amy Tangerine and the embellishments are Echo Park Chipboard and Jillibean letter Stickers.


So as you can see the punches can offer a lot of pop to a page in a variety of ways. I hope you enjoyed checking out the new punches and that you liked the layouts. Don't forget to leave a comment on here for a chance to win the punches! You have until Sunday, July 8th at midnight to leave a comment and I will pick a winner on Monday, July 9th. Please make sure and check back that day to see if you are winner!!

Also don't forget if you want to better your odds go check out the the other design team members as well.  Jackie has some darling cards to show you at: http://shortwizard.blogspot.com
and I am not sure what projects Missy has created but I am sure they will be fantastic: tonicgallery.wordpress.com

Make sure and come back tomorrow to see the next 3 punches! Till then Happy Creating!


Wednesday, May 2, 2012

Mother's Day Projects

So my first projects have been posted on the Tonic blog! I was so excited to see it! I had given you a peak of what the layout had looked like. Now you can see the two cards and the layout. The layout is of my sister in law with my niece and nephew. The two cards are mother's day cards.


If you want any ideas of what tonic punches/tools were used to make the items or step by step instructions check out the link here.

I hope you enjoy the projects. All pattern papers are American Crafts Garden Cafe. I love the bright fun colors! Next I have to plot how I am going to spend the weekend since Saturday is National Scrapbooking Day. I may have to dedicate some time to the wonderful hobby this weekend!

Happy Creating!