Total Pageviews

Showing posts with label scrapbooking. Show all posts

Sunday, October 20, 2013

You Are in For a Treat!

I just wrapped up some fun and not too scary Halloween cards and treat bags. I went to one of my go to companies for Halloween- Doodle Bug! I just love how you can use all of their collections from years prior together and make your scrappy dollars go further!  Plus its loads of fun to mix and match their papers, stickers, and dimensional stickers to see how many possibilities you can come up with.

I hope these inspire you to make some cute Halloween cards for the goblins in your life!  Here are the cards all together. I will show you close ups of each as well!


I mostly use the 6x6 paper pads for my cards. This way the design of the pattern papers are in proportion with the size of the card. You also have the entire collection to play with  which gives you endless possibilities.

 
This one I used a border sticker on it, to give it a little bit of glam.

 
I always find tower cards the hardest to design, so I try to make myself design one each time I make some cards.

 
This year in addition to my cards I also made some treat bags. This would be so much fun to make with the kids if you had a party or to have ready for any Halloween get togethers you have coming up. They don't take long to make. Again I used the 6x6 paper pads, some of their stickers and some border punches. The bags I had purchased, the kraft ones are from Michaels and the polka dot ones are from Pebbles, 31 line.
 
Just cut your topper the width of the bag and make sure you have a bit to fold over so you can staple it to the top of the bag.
 
Here are the two with the polka dot treat bags and with Doodle Bug's current Halloween line.


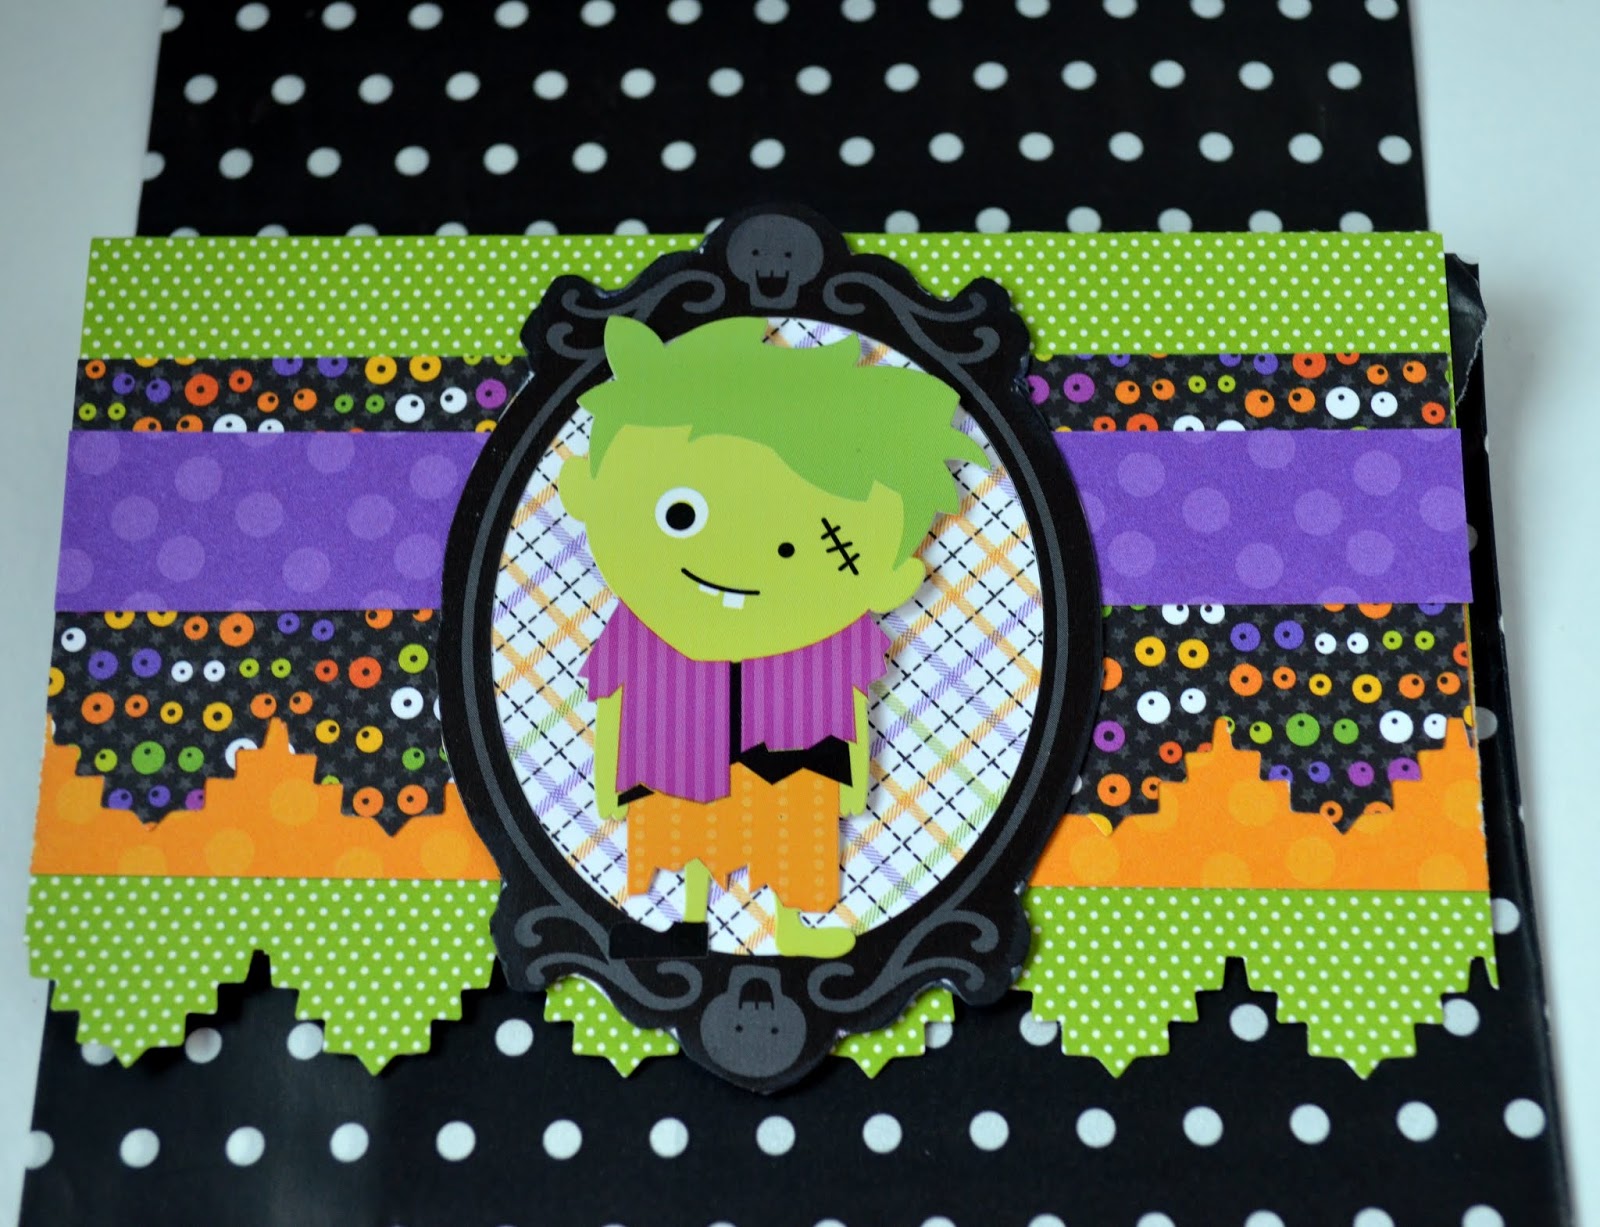
Here is Frankie's close up.

 
Here is the Witch's close up.

 
These are the treat bags that I had purchased from Michaels. They were located in the gift wrap area of the store. On these I used Doodlebugs Halloween collection from last year.

 
Here is a close up of the ghost. On these I also decorate the fronts as well since they were only kraft in color and I thought they needed a bit more!

 
The other close up.


I hope these inspire you to make some fun Halloween cards or treat bags. If you have any questions please feel free to ask. Happy Scary creating!
 
Next up I will have a home décor Halloween banner that I whipped up with Teresa Collins Paper Halloween line along with some embellishments from Anna Griffin.


Saturday, October 5, 2013

I am Back... Refreshed and Ready to go!

I know, its been awhile since I had last posted. It wasn't my intention to take a hiatus from the blogging world, but life got in the way.

For me years are in school years since I work for a school district. At the start of last summer everything was going fast and furious and everything was going well, almost too well. Husband was back to working fulltime and not doing temp work, and I had just received a promotion. Things couldn't be better in the career arena.

Shortly after we found out we were expecting. This was the cherry on top of everything else going well. This had been a long roller coaster of a journey for us since it was 3 years in the making and we had pretty much given up any hope of it becoming real for us. We were ecstatic when we found out. We were at 12 weeks; and had just shared the news with most family and friends. I had my first appointment with a doctor at that time and everything came crashing at that point. We found out during the ultrasound that the baby had died. Its been a much tougher journey then I had anticipated to bounce back. Hence why I took some time to slow down a bit.

I can't believe its been a year since all of that has happened life moves way too quickly. With that being said Fall is peaking its head in good old Wisconsin and for me this season is the highlight of the entire year. I am going to try and start sharing some of the projects I have been working on. I recently took the plunge and started project life style scrapbooking, I have a Halloween banner that I just finished,and cards will of course be on the way as well. I look forward to sharing all of these goodies with you again.

Here is my favorite card from last year to get you all in the Fall Halloween mood! Supplies are Doodlebug, their Halloween collection from last year. Its no surprise that I have once again bought some of their goodies this year as well and I can't wait to go play and create with!

 
Happy Creating!

Monday, January 28, 2013

Do I feel a Little Love in the Air?

Well the month of January has definitely flown by. I can't believe in a few short days it will be February. February brings Valentine's Day! A day where you take a moment to cherish all of the relationships and friendships in your life.
 
I had fallen in love with the Carta Bella's Devoted line. Its all of your traditional colors for Valentine's with a twist of two of my favorite colors: Grey and Aqua. This line is so cute and I am sure a few other projects will also be done with it yet.
 
I did a very simple layout with a pic of my brother and sister in law with their oldest child. I think this is such a great picture and I didn't want the layout to take that away. This picture along with some of the other pictures in my previous post were all taken by their super talented friend Jenny.
 
I used my mini heart punch and my simplicity doily border punch from Tonic Studio to make the embellishment that goes across the page. I punched the hearts out at regular intervals and then I made two border strips with the doily punch. I then backed the heart strip with a coodinating pattern paper and adhered it all together in one layered strip. I then used the actual punched out hearts on the corner of the layout.
 
Here are some close ups of the layout so you can see the details of the punches.


So what Valentine Projects do you have up your sleeve this year? I would love to hear about them. I have a few cards and special projects to work on myself yet!
 
Happy Creating!

Wednesday, January 9, 2013

Calendar Love

I have an annual tradition, each year I make my mom a calendar with photos of us lovely kids, grandkids and grandpups. Typically she gets it "close" to the start of the new year. It's fun finding the perfect photos from the year to showcase during the upcoming year. I love making the calendar layouts since these layouts are typically simpler, cleaner layouts then your traditional day to day scrapping. I had fun playing around with different lines in my stash and playing with some new fun washi tape. I thought I would share the layouts to help inspire creativity in the new year. Mom will get a sneak peek as well since she doesn't pick up the calendar till this weekend! I will keep a few layouts for surprise.

Every year we try to do at least one picture with the entire gang. This year we made use of the computer to take our picture. This line from Simple Stories lent itself well to this picture. I loved working with the bright papers and embellishments.


This picture is of my parents on vacation. I used Dear Lizzy's 5th and Frolic line for this layout. I also used the EK banner punch to add some fun to the page. Plus I needed an excuse to use all of the fun pattern papers!
 
Here is a cute layout of my niece and nephew with Santa. I had fun using some of my Christmas paper stash. 


My brother and his family had some super cute family photographs taken this year, so we had to include them in the calendar.


 Last but not least there has to be a layout of the crazy grandpup, who is loving all of the winter snow.


 I hope the layouts inspire some fun simple scrapbooking. I can't wait to dig into some projects this year. Happy Creating!


Tuesday, September 18, 2012

A Chill is in the Air!

I would so be in heaven if I could find a place that was always wrapped in the beautiful colors of fall and the awesome crisp temperatures. Anyone know where this place exists??

Can you tell, I am so loving this weather? The nice cool crisp air, no more of the 90+ degree days.. I think we ended up with like 39 of those this summer.. Ucky-Not for me!

Fall is my favorite time of the year and I was so excited to see what Simple Stories Harvest Lane collection looked like. Needless to say I was not disappointed! Its a very cute collection with all the fun ,rich, earthy colors of fall. I made a layout and a card with the collection and I can't wait to make more with it since I have tons of fall pictures due to our yearly trips to Door County.

On the layout I used the following Tonic Punches:

Tonic Tools used: Edger Punch 3, Border Punch: Pumpkin, Maple Leaf and Fall, Simplicity Border Punch- Scalloped Diamond Punch, Duo Ticket and Tag punch.

Here is a close up of the heart embellishment.


The heart embellishment is a 4x4 piece of cardstock covered with layered border punch strips. I then used one of the 4x4 elements on the pattern piece of paper I then used my scissors to cut the heart out and then layered it on top with pop dots so you can see the fun pattern paper through the cut out.
Here is a fun simple card I made as well with the collection. This is geat for a new homeowner or someone who may have recently moved into their own place.


Here are the two projects together.


Well I hope my projects inspired you to make a fall project! Happy Creating!

Tuesday, August 14, 2012

Chevrons and Simple.. What more can I say

I apologize that I haven't posted in awhile. Life has gotten a little crazy for us lately. Rest assured it is all crazy good! With all the craziness the scrapbooking took a brief hiatus. I am back though and right now I have been loving anything that has a chevron. Not sure why... maybe its the bold colors with the high contrast of usually white in the pattern. I just like the clean look of the design.

I have been looking at my Tonic punches wondering what I can do to  use one of them a little differently. I then found that the Simplicity Border Punch in the Scalloped Diamond pattern resembles a chevron design. I couldn't wait to play and find just the right width of paper strip to use. I found that using a 1.5 in wide paper and however long works the best. So I cut a bunch of strips and began punching away!

This layout is way simpler then I am used to doing, but I love how it turned out. Very crisp and graphic. Plus who doesn't love a picture of a cute kid with his daddy! This was a cute picture of my brother and his little guy. I hope you like what I came up with and I challenge you to use a punch in a different way and see what you can come up with.

Here is my layout:


Don't you just love the chevron look of the punches! I hope you enjoyed and Happy Creating!

Monday, July 2, 2012

Day 3 of Tonic Punches Summer CHA Reveal!

This is it!!!

These are the last 3 punches of the bunch. I hope you have enjoyed all of the projects we have come up with to showcase the punches. Remember there are giveaways as well. Remember to leave a comment on this post and on yesterdays and Saturday's if you haven't already.. also make your chances are even better & go check out the other two design team members blogs, Missy's blog  & Jackie's Blog and comment there as well! Please  note, The giveaway is only open to those in the US.

I will pick a winner on July 9th from each day to win that set of punches. If you have other crafty friends please pass on the word!


Today we are featuring the Scalloped Diamond Border, Daisy Border and the Vine Strip.

On this layout I used the Scalloped Diamond Border. As you can see the punches are easy to use so I was able to make lots of borders in all sorts of colors to decorate my circles that I used as accents. This close up shows you the fun pattern the border makes.


Don't you just love the colors of this Basic Grey paper?? It works so well with the pictures of the niece and nephew playing in their car.


Here is how it all came together.


Next I used the Daisy Border and the Vine Strip together for a wedding layout. I want to show you a close up these two punches in action. I have two daisy borders back to back with the vine strip in the middle. 


Here is how this layout turned out. I actually later found some really cool white and and some small pink pearls that I added to embellish the daisy centers.


I hope you were able to get a lot of ideas on how to use these punches the last 3 days and hopefully you have commented on all 3 days posts in order to have a chance to win the set featured that day!

Thanks for following along with us and Happy Creating!


Sunday, July 1, 2012

Day 2 of Tonic Summer CHA Release Reveal

I hope you enjoyed yesterday's projects and that you left a comment on yesterday's post so that you  have a chance to win the 3 punches showcased yesterday. We are doing the same thing today and tomorrow as well. We are featuring another 6 punches and you have a chance to win by leaving a comment on the next two days. I will pick the winners on July 9th, so please make sure and check back to see if you are winner. (Please note the contest is limited to those in the US.)


You can check out the other 2 design team members blogs as well for another chance to win! Here are the links to their blogs Missy's can be seen here at: http://tonicgallery.wordpress.com/
and Jackie's can be seen  here at: http://shortwizard.blogspot.com/


Today, we are showcasing the Victorian Border Punch, the Doily border and the Floral Border. In the layout below I used the Doily and the Victorian Border.


I even used the border punch on the rosettes.


When making the rosettes I used hot glue and placed them on a circle to give them sturdiness.

I then used the tonic petal pairs to embellish the middle of them.

The other layout showcases the Floral border and the Victorian Border. I also used the Multi Detail Butterfly punch as well.


I hope you enjoyed today's reveal and that you go back and check out yesterday's post for a chance to win that set of punches and come back and see us tomorrow for our final reveal.

Don't forget to leave a comment for a chance to win these punches!!!

Happy Creating!!!


Wednesday, May 2, 2012

Mother's Day Projects

So my first projects have been posted on the Tonic blog! I was so excited to see it! I had given you a peak of what the layout had looked like. Now you can see the two cards and the layout. The layout is of my sister in law with my niece and nephew. The two cards are mother's day cards.


If you want any ideas of what tonic punches/tools were used to make the items or step by step instructions check out the link here.

I hope you enjoy the projects. All pattern papers are American Crafts Garden Cafe. I love the bright fun colors! Next I have to plot how I am going to spend the weekend since Saturday is National Scrapbooking Day. I may have to dedicate some time to the wonderful hobby this weekend!

Happy Creating!

Monday, April 23, 2012

Something to cross off the Bucket List!

So if you have been following my blog you can see that I have been attempting to get noticed in the scrapbooking industry. I have applied for many a design team as of lately. My motto is to try, try, try and try again.. Which can get frustrating, but I love the hobby so at least I enjoy trying!

In March, I received a little recognition for one of my projects.  I was excited to find out that I had won the American Crafts Facebook challenge. My Pebbles tray was selected as the winner that week. You can see the link here. I will have to post some pics of the goodies they sent me!

Later that month, I had seen that Tonic Studios, a scrapbooking tools company was looking to add to their US design team. I had seen this on facebook... Can I just say that facebook has been a great way to network lately! So I went down and pulled out what I could find of my Tonic punches and tools and started searching my brain on what I could make that would stand out. I started with a sketch, which by the way looks nothing like the finished layout. My creative process at times is all over the place, which isn't always bad.

This is what I came up with, a lovely layout of my little niece. I have been waiting to come up with a cool idea on how to showcase this picture.


Well as luck would have it later on that week I checked my email and low and behold, I had an email asking if I would like to design for Tonic.

Let's just say it made my day! I was so excited!! I am so excited for this opportunity. I recently received my goodies to start playing with and designing with and also received my first assignment: Mother's day..

This weekend, I just completed my first assignment for them. I made a couple of mother day cards and a layout.

For now here is a sneek peak of the layout.

I hope you are all having a great month like I have had! Now I can cross one thing off my bucket list.  Now on to the next item! What is something that is on your bucket list?

Happy Creating!