Total Pageviews

Sunday, November 24, 2013

The Project Life Method for Scrapbooking

So I have delved into the world of project life. I felt I just had way too many stacks of pictures to ever catch up with so I thought I would give this method a chance.  It was worth a shot at least, right?? You never know if you don't try!

We have gone on a many a trip and between those pictures and all of the everyday pictures they just began to stack up.. What can a person do!  I know Project Life has been available for some time, but I am one of those scrappers who like to see, touch, feel the product before buying! So now with Project Life being available pretty much everywhere along with the other companies offering project life style products as well I thought I would give it a try.

I started by grabbing a stack of my photos from our Disney Trip. What better type of project to start with, its one with tons of pictures and the pictures really do tell the story on their own with only a little journaling needed. I started by sorting the pictures by park and found the notes I had taken from the trip. Once the pictures were sorted by park, I  grabbed product that I had bought to scrap the trip traditionally along with the Project Life Pages. Since this was my first time attempting the Project Life method its kind of a hybrid.  I made traditional 12x12 layouts for each introductory page for each park and for any pictures that I wanted to show case more of. Next, I looked at the pictures to see what type of page layout would work. I placed the pictures in the pages and left areas open to go back to journal and embellish. It was a great way to help visualize how the album would look. I also love using a 3 ring binder you can so easily slip pages in and out and move things around if needed. I am a total convert to binders now instead of post bound albums, which is another big change for me.

Let me tell you I have never whizzed though a project faster! It was so nice since you could go move things back around if needed to make the design work better or to add another picture. Also I actually saw progress happening. My stacks of pictures were in pages instead of stacks! It was such a nice feeling! Plus I was still able to take time on some layouts and do more traditional layouts if I wanted or add them in later. Since completing the Disney trip I have now moved on to putting together all our Bulldog's pictures into one of the mini albums and I am using Blush and 5th and Frolic for our wedding! Both projects are going awesome and I am hopeful with the starting year I am going to do project life for our daily pictures also.

I haven't taken many pictures of the Disney Album but hope to have it photographed soon and I will post the link, but I do have some pictures of the other projects I had started with Project Life.


Here are some pictures of the Otis's Album. I have mostly used the Dog mini kit and I went into my other core kits to find other cards that coordinated with the colors of the mini kit. I have used some Thickers, and some Washi tape, and a journaling pen. Not much is needed to pull an awesome book together!

 This is the first page of his album.

 
Here is another layout from his album:
 
Here is a layout from the wedding:

 
And here is one that I put together from another trip of ours. I have gotten a little excited about this method so I have started working on a few projects at once which isn't hard to do since a lot of supplies aren't needed so it isn't as an ordeal if I was working on them the more traditional style.


Here is a close up for each page:


So who else out there are Project Life type storytellers? Drop me a comment to let me know about your journey into Project Life or what your favorite kit is!
 
Happy Scrapping!

Tuesday, October 22, 2013

Banner Fun!

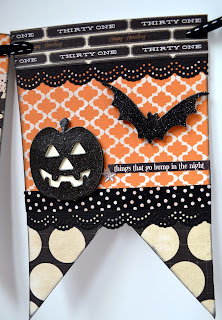
I have seen all these cute banners on Pinterest and Etsy, which inspired me to give banner making a  try. I started out with a small banner to get my feet wet, and I am liking how it turned out.

I started with a plain cardboard banner set that I had purchased quite some time ago. I then went to my stash to find a cute Halloween paper line. I decided to use Teresa Collins, Masquerade Party 6x6 paper pad. I then dug deep into my stash and found a package of glitter embellishments from Anna Griffin. This was coming together much easier than I thought it would. The only other supplies used was a border punch, ribbon, cardstock and adhesive.


Here is a close up of each piece of the banner. I started by cutting each piece of paper the correct width and played with different patterns to see which ones I liked next to each other. I tried to do some repetition in the patterns to make the whole banner tie together.


Here is how the finished project looks. I can't wait to get started on my next banner project.
 I am thinking something for the upcoming Christmas holidays. I just need to find the perfect paper and embellishment line that will work with the rest of our holiday décor. I am sure that won't be a problem since I have seen many cute Christmas lines hit the stores already!
 
 
One last picture to show you how it looks with other Halloween décor in our home.


I would love to hear about what types of Halloween décor items you have created this year or what Pinterest has inspired you to try this Halloween season. Please share in the comments below, since I am always looking for ideas for next year!
 
Happy Creating!

Sunday, October 20, 2013

You Are in For a Treat!

I just wrapped up some fun and not too scary Halloween cards and treat bags. I went to one of my go to companies for Halloween- Doodle Bug! I just love how you can use all of their collections from years prior together and make your scrappy dollars go further!  Plus its loads of fun to mix and match their papers, stickers, and dimensional stickers to see how many possibilities you can come up with.

I hope these inspire you to make some cute Halloween cards for the goblins in your life!  Here are the cards all together. I will show you close ups of each as well!


I mostly use the 6x6 paper pads for my cards. This way the design of the pattern papers are in proportion with the size of the card. You also have the entire collection to play with  which gives you endless possibilities.

 
This one I used a border sticker on it, to give it a little bit of glam.

 
I always find tower cards the hardest to design, so I try to make myself design one each time I make some cards.

 
This year in addition to my cards I also made some treat bags. This would be so much fun to make with the kids if you had a party or to have ready for any Halloween get togethers you have coming up. They don't take long to make. Again I used the 6x6 paper pads, some of their stickers and some border punches. The bags I had purchased, the kraft ones are from Michaels and the polka dot ones are from Pebbles, 31 line.
 
Just cut your topper the width of the bag and make sure you have a bit to fold over so you can staple it to the top of the bag.
 
Here are the two with the polka dot treat bags and with Doodle Bug's current Halloween line.


Here is Frankie's close up.

 
Here is the Witch's close up.

 
These are the treat bags that I had purchased from Michaels. They were located in the gift wrap area of the store. On these I used Doodlebugs Halloween collection from last year.

 
Here is a close up of the ghost. On these I also decorate the fronts as well since they were only kraft in color and I thought they needed a bit more!

 
The other close up.


I hope these inspire you to make some fun Halloween cards or treat bags. If you have any questions please feel free to ask. Happy Scary creating!
 
Next up I will have a home décor Halloween banner that I whipped up with Teresa Collins Paper Halloween line along with some embellishments from Anna Griffin.


Saturday, October 5, 2013

I am Back... Refreshed and Ready to go!

I know, its been awhile since I had last posted. It wasn't my intention to take a hiatus from the blogging world, but life got in the way.

For me years are in school years since I work for a school district. At the start of last summer everything was going fast and furious and everything was going well, almost too well. Husband was back to working fulltime and not doing temp work, and I had just received a promotion. Things couldn't be better in the career arena.

Shortly after we found out we were expecting. This was the cherry on top of everything else going well. This had been a long roller coaster of a journey for us since it was 3 years in the making and we had pretty much given up any hope of it becoming real for us. We were ecstatic when we found out. We were at 12 weeks; and had just shared the news with most family and friends. I had my first appointment with a doctor at that time and everything came crashing at that point. We found out during the ultrasound that the baby had died. Its been a much tougher journey then I had anticipated to bounce back. Hence why I took some time to slow down a bit.

I can't believe its been a year since all of that has happened life moves way too quickly. With that being said Fall is peaking its head in good old Wisconsin and for me this season is the highlight of the entire year. I am going to try and start sharing some of the projects I have been working on. I recently took the plunge and started project life style scrapbooking, I have a Halloween banner that I just finished,and cards will of course be on the way as well. I look forward to sharing all of these goodies with you again.

Here is my favorite card from last year to get you all in the Fall Halloween mood! Supplies are Doodlebug, their Halloween collection from last year. Its no surprise that I have once again bought some of their goodies this year as well and I can't wait to go play and create with!

 
Happy Creating!

Monday, January 28, 2013

Do I feel a Little Love in the Air?

Well the month of January has definitely flown by. I can't believe in a few short days it will be February. February brings Valentine's Day! A day where you take a moment to cherish all of the relationships and friendships in your life.
 
I had fallen in love with the Carta Bella's Devoted line. Its all of your traditional colors for Valentine's with a twist of two of my favorite colors: Grey and Aqua. This line is so cute and I am sure a few other projects will also be done with it yet.
 
I did a very simple layout with a pic of my brother and sister in law with their oldest child. I think this is such a great picture and I didn't want the layout to take that away. This picture along with some of the other pictures in my previous post were all taken by their super talented friend Jenny.
 
I used my mini heart punch and my simplicity doily border punch from Tonic Studio to make the embellishment that goes across the page. I punched the hearts out at regular intervals and then I made two border strips with the doily punch. I then backed the heart strip with a coodinating pattern paper and adhered it all together in one layered strip. I then used the actual punched out hearts on the corner of the layout.
 
Here are some close ups of the layout so you can see the details of the punches.


So what Valentine Projects do you have up your sleeve this year? I would love to hear about them. I have a few cards and special projects to work on myself yet!
 
Happy Creating!

Wednesday, January 9, 2013

Calendar Love

I have an annual tradition, each year I make my mom a calendar with photos of us lovely kids, grandkids and grandpups. Typically she gets it "close" to the start of the new year. It's fun finding the perfect photos from the year to showcase during the upcoming year. I love making the calendar layouts since these layouts are typically simpler, cleaner layouts then your traditional day to day scrapping. I had fun playing around with different lines in my stash and playing with some new fun washi tape. I thought I would share the layouts to help inspire creativity in the new year. Mom will get a sneak peek as well since she doesn't pick up the calendar till this weekend! I will keep a few layouts for surprise.

Every year we try to do at least one picture with the entire gang. This year we made use of the computer to take our picture. This line from Simple Stories lent itself well to this picture. I loved working with the bright papers and embellishments.


This picture is of my parents on vacation. I used Dear Lizzy's 5th and Frolic line for this layout. I also used the EK banner punch to add some fun to the page. Plus I needed an excuse to use all of the fun pattern papers!
 
Here is a cute layout of my niece and nephew with Santa. I had fun using some of my Christmas paper stash. 


My brother and his family had some super cute family photographs taken this year, so we had to include them in the calendar.


 Last but not least there has to be a layout of the crazy grandpup, who is loving all of the winter snow.


 I hope the layouts inspire some fun simple scrapbooking. I can't wait to dig into some projects this year. Happy Creating!


Saturday, January 5, 2013

Tonic Studios CHA Winter Sneak Peek

Here is a little peek at what Tonic will be releasing at CHA next week. These great dies and tools will be arriving in stores this April!
 
Want to see pics of the new goodies? Check them out here: Tonic's Winter Sneak Peek
 
Stop back over the next few weeks for oodles of inspiration featuring these fun new products! Thanks for stopping by and for supporting Tonic Studios!

Have a great rest of the weekend and Happy Creating!